In this article, I’ll walk you through my experience supporting a customer in the ASEAN region on their WebLogic modernization journey. As part of a broader transformation initiative, we moved from traditional WebLogic deployments on virtual machine to a cloud-native architecture powered by Red Hat OpenShift Container Platform, using the WebLogic Kubernetes Operator (WKO) to streamline operations.
The goal was clear: improve portability, enable automation, and bring greater operational efficiency to their platform. Throughout this journey, we tackled real-world challenges, aligned legacy workloads with modern infrastructure practices, and built a more scalable, resilient foundation for the future.
This blog covers the key concepts, practical steps, and lessons learned throughout the journey. You can refer to the following GitHub repository to walk through the implementation step by step.
What is WebLogic Kubernetes Operator (WKO)?
The WebLogic Kubernetes Operator (WKO) enables organizations to run WebLogic Server and Fusion Middleware Infrastructure domains on Kubernetes/OpenShift, a cloud-neutral, industry-standard container orchestration platform. It allows you to package your complete Oracle WebLogic Server environment including applications and configurations into portable container images along with Kubernetes resource definitions.
These portable artifacts can be deployed consistently across on-premises environments or any public cloud that supports Kubernetes, wherever the operator has been installed.
The operator integrates seamlessly with modern CI/CD workflows. In this implementation, we leveraged Azure DevOps Pipelines to streamline the promotion of workloads across environments from testing to production by enabling configuration changes to be injected at deployment time.
For instance, database connection strings, credentials, and other environment-specific parameters were externalized and dynamically applied during the deployment process. This approach allowed us to maintain a single base image while introducing configuration updates without the need to rebuild or modify the underlying image, improving efficiency and consistency across environments.
By leveraging the Kubernetes operator pattern, the WebLogic Kubernetes Operator uses Kubernetes APIs to automate essential operational tasks, including provisioning, lifecycle management, application versioning, patching, scaling, and security. It also integrates seamlessly with Kubernetes-native tools for monitoring, logging, tracing, and security, enabling efficient cloud-native operations.
Install WKO with Helm
Before installing the operator, you must first make the operator Helm chart accessible to your environment. The Helm chart contains everything required to deploy and manage the operator, including:
- Preconfigured default values for operator settings
- Configurable Helm values for customizing operator behavior
- Commands to install or uninstall the operator
To access the Helm chart, you need to configure your Helm client with the appropriate chart repository.
- You can use the official WebLogic Kubernetes Operator Helm chart repository available at https://oracle.github.io/weblogic-kubernetes-operator/charts. Alternatively, you may host the chart in a custom repository that you manage.
- To configure your Helm installation to use the official repository and register it with the name
weblogic-operator, run the following command:
❯ helm repo add weblogic-operator https://oracle.github.io/weblogic-kubernetes-operator/charts --force-update- To confirm that a Helm chart repository has been successfully added, or to view all repositories currently configured in your Helm client, you can list the existing repositories.
❯ helm repo list

NAME             	URL
bitnami          	https://charts.bitnami.com/bitnami
gitlab           	https://charts.gitlab.io/
weblogic-operator https://oracle.github.io/weblogic-kubernetes-operator/charts- Create and configure the namespace and service account for the operator.
❯ oc new-project weblogic-operator

Now using project "weblogic-operator" on server "https://api.<your-cluster-domain>:6443".

You can add applications to this project with the 'new-app' command. For example, try:

    oc new-app rails-postgresql-example

to build a new example application in Ruby. Or use kubectl to deploy a simple Kubernetes application:

    kubectl create deployment hello-node --image=registry.k8s.io/e2e-test-images/agnhost:2.43 -- /agnhost serve-hostname

❯ oc create serviceaccount -n weblogic-operator weblogic-sa

serviceaccount/weblogic-sa created
During the operator installation process, you define the target namespace by using the --namespace MY-NAMESPACE option in the Helm install command. If this option is not provided, the namespace defaults to default.
Similarly, you can specify which service account the operator should use by setting serviceAccount=MY-SERVICE-ACCOUNT in the Helm install command. This service account must exist in the operator’s namespace. If not explicitly defined, it defaults to the default service account.
Like the namespace, the service account will not be automatically removed when the operator is uninstalled.
❯ helm install weblogic-operator weblogic-operator/weblogic-operator \
  --namespace weblogic-operator \
  --set "javaLoggingLevel=FINE" \
  --set "serviceAccount=weblogic-sa" \
  --set "kubernetesPlatform=OpenShift" \
  --set "domainNamespaceLabelSelector=weblogic-domain=true" \
  --wait

NAME: weblogic-operator
LAST DEPLOYED: Thu Feb 19 20:08:07 2026
NAMESPACE: weblogic-operator
STATUS: deployed
REVISION: 1
TEST SUITE: None
This command creates a Helm release named weblogic-operator in the weblogic-operator namespace. It provisions the operator deployment along with all required supporting resources, and then deploys the operator to the cluster.
In this setup, I configured kubernetesPlatform=OpenShift in the parameters to indicate that the operator is running on Red Hat OpenShift.
Additionally, I set domainNamespaceLabelSelector=weblogic-domain=true. Instead of explicitly listing namespaces during installation, this configuration allows the operator to watch any namespace that contains the specified label. By applying the label weblogic-domain=true to a namespace, you can dynamically designate it as a WebLogic domain namespace without reinstalling or reconfiguring the operator.
This approach provides greater flexibility and simplifies namespace management.
You can confirm that the installation was successful by reviewing the output generated by the helm install command. For more detailed configuration information, please refer to the following link.
https://oracle.github.io/weblogic-kubernetes-operator/managing-operators/using-helm/index.html.
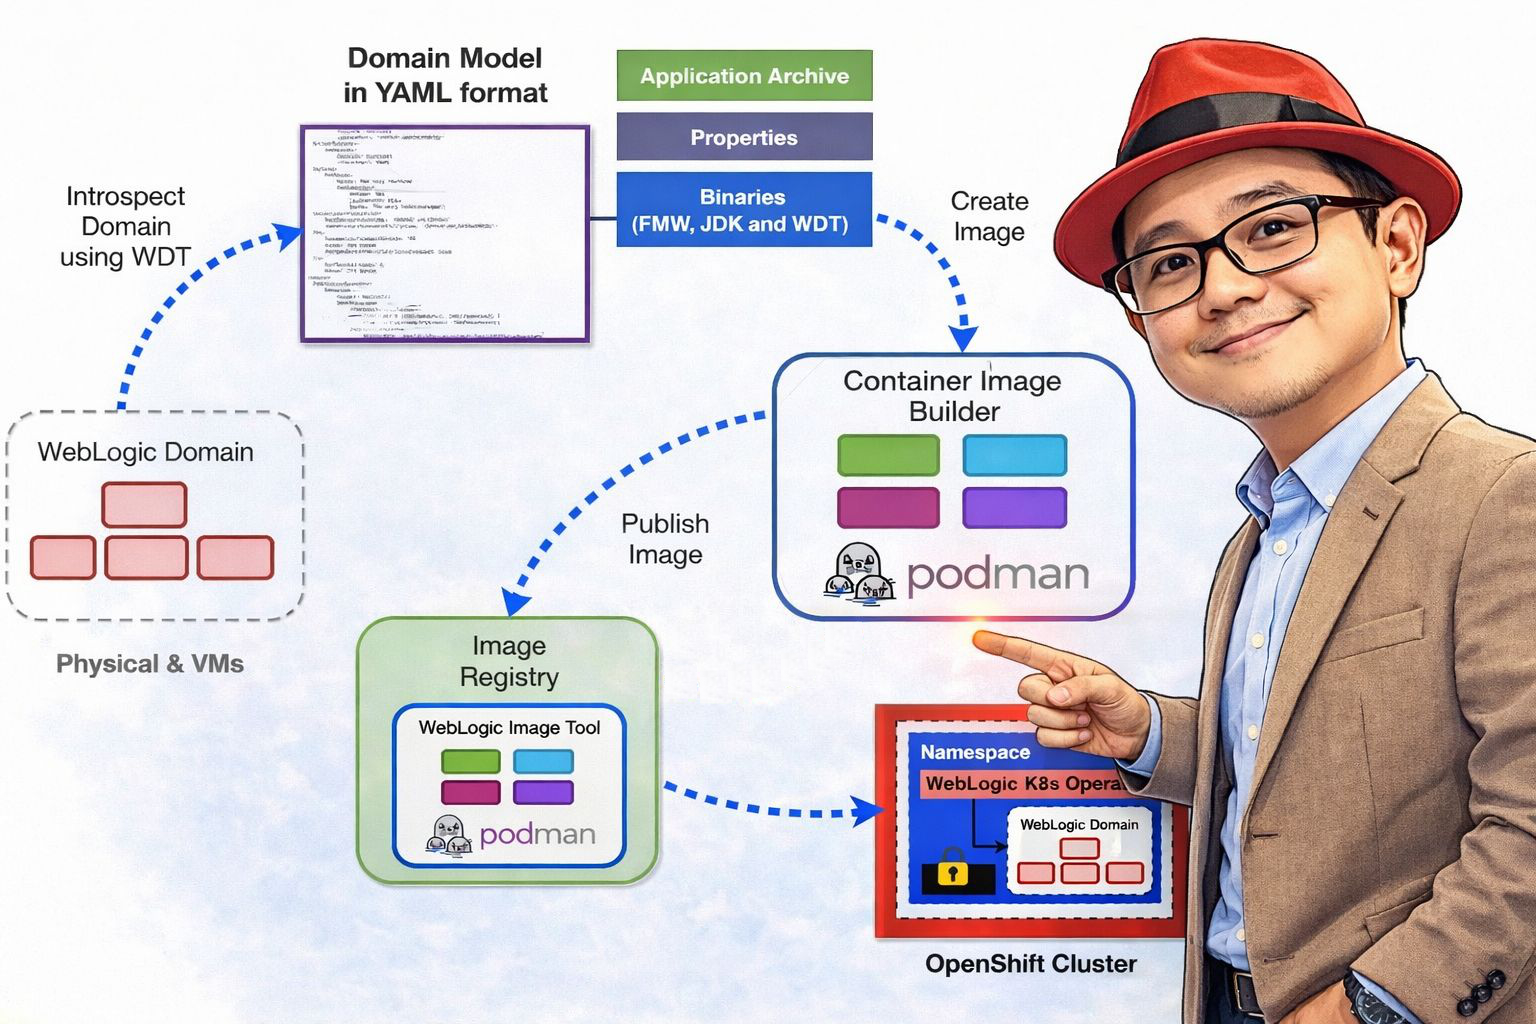
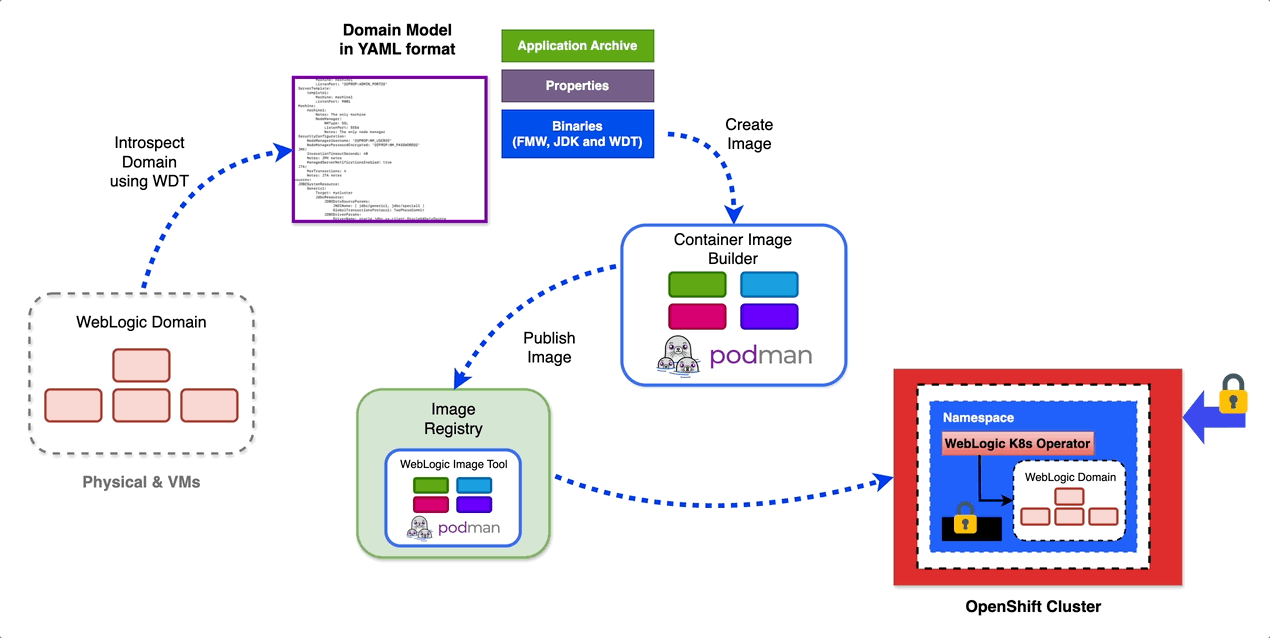
Domain Management
A Domain resource defines all the necessary components required to run a WebLogic domain, including the domain configuration, the WebLogic installation, container images, and other related settings.
Starting from Operator version 4.0, WebLogic clusters defined within a domain configuration can optionally be linked to a separate Cluster resource, in addition to the Domain resource. This provides greater flexibility and more granular management of cluster-specific settings.
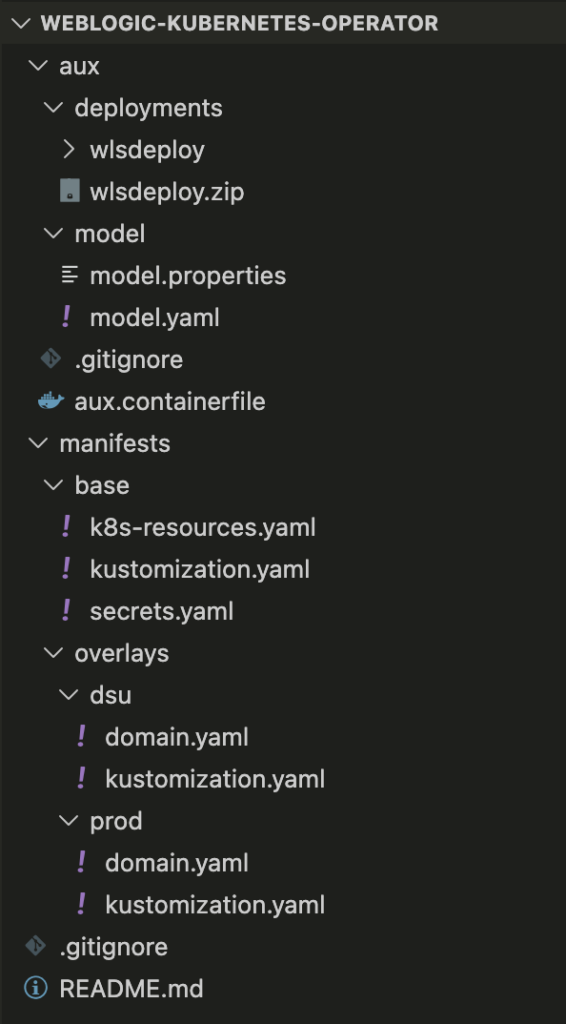
This article will follow the directory structure outlined below:
Create and Configure Application Namespace
In this example, we will create an application namespace named app1, apply the required label so it is recognized by the operator, and verify whether the necessary ConfigMap is automatically created.
- Create the application namespace:
❯ oc new-project app1

Now using project "app1" on server "https://api.<your-cluster-domain>:6443".

You can add applications to this project with the 'new-app' command. For example, try:

    oc new-app rails-postgresql-example

to build a new example application in Ruby. Or use kubectl to deploy a simple Kubernetes application:

    kubectl create deployment hello-node --image=registry.k8s.io/e2e-test-images/agnhost:2.43 -- /agnhost serve-hostname
2. Add label to namespace to make it a domain namespace:
❯ oc label namespace app1 weblogic-domain=true

namespace/app1 labeled

❯ oc get namespace app1 --show-labels

NAME   STATUS   AGE   LABELS
app1   Active   9h    kubernetes.io/metadata.name=app1,pod-security.kubernetes.io/audit-version=latest,pod-security.kubernetes.io/audit=restricted,pod-security.kubernetes.io/warn-version=latest,pod-security.kubernetes.io/warn=restricted,weblogic-domain=true
3. Once the namespace is labeled, the operator should automatically create the required ConfigMap in the app1 namespace:
❯ oc get configmap | grep weblogic-scripts-cm

weblogic-scripts-cm        30     9h
Model in Image (MII)
Auxiliary Image
Auxiliary images are the recommended approach for including Model in Image (MII) artifacts such as model files, application archives, and the WebLogic Deploy Tooling (WDT) installation—within your pods. This method removes the requirement to bundle these artifacts directly into the image referenced by domain.spec.image.
Instead:
- The
domain.spec.imagefield references a base image that contains only the WebLogic installation and a Java runtime. - The domain resource’s auxiliary image configuration references one or more lightweight images that contain the required Model in Image artifacts.
Benefits of using Auxiliary images for Model in Image domains:
- Patch or update the WebLogic installation image without embedding WDT, application archives, or model files inside it.
- Reuse a single WebLogic installation image across multiple domain configurations, each supplied through different auxiliary images.
- Independently distribute or update model files, application archives, and the WDT executable using dedicated images that do not include a WebLogic installation.
- Improve separation of concerns between the runtime image and configuration artifacts.
We will build the Auxiliary container image which include model.yaml, model.properties, and sample deployment artifact.
aux.containerfile
# Auxiliary container file
FROM registry.access.redhat.com/ubi9:9.7

# WebLogic Deployment Tool (WDT) version argument
ARG \
  WDT_VERSION=4.4.3

# Prepare the directory for the required files
RUN \
  mkdir -p /tmp/install /auxiliary/models /auxiliary/weblogic-deploy

# Copy the deployment artifact and model files into container image
ADD deployments/wlsdeploy.zip /auxiliary/models
COPY model/* /auxiliary/models

# Download and extract the WDT from GitHub
RUN curl -L -o /tmp/install/weblogic-deploy.tar.gz https://github.com/oracle/weblogic-deploy-tooling/releases/download/release-$WDT_VERSION/weblogic-deploy.tar.gz \
    && tar -xzf /tmp/install/weblogic-deploy.tar.gz -C /auxiliary/ && \
      find /auxiliary/weblogic-deploy -name '*.sh' -exec chmod 775 {} \;

USER 0

# Change the directory privileges
RUN \
  chown -R 1000:0 /auxiliary \
  && \
  chmod 775 -R /auxiliary /auxiliary/models /auxiliary/weblogic-deploy \
  && \
  rm -rf /tmp/install

# Set few environment variables
ENV \
  AUXILIARY_IMAGE_PATH=/auxiliary \
  WDT_HOME=/auxiliary \
  WDT_MODEL_HOME=/auxiliary/models

USER 1000

# Set the working directory
WORKDIR /auxiliary

CMD /bin/bash
You can build aux.containerfile file above with Podman or Docker CLI.
❯ podman build -t --platform linux/amd64 quay.io/rh_rh/wko-aux:latest -f aux.containerfile .

STEP 1/12: FROM registry.access.redhat.com/ubi9:9.7
STEP 2/12: ARG   WDT_VERSION=4.4.3
--> Using cache 9c9cd843e528c942dccbbc0370dad626843c88db5ad773d0736a913fb9602a8f
.....

STEP 11/12: WORKDIR /auxiliary
--> cb8c7ccd13ac
STEP 12/12: CMD /bin/bash
COMMIT quay.io/rh_rh/wko-aux:latest
--> 9b1988285433
Successfully tagged quay.io/rh_rh/wko-aux:latest
9b198828543328eaeba1d791ed5aa25719f2e0e2b5133c8a5d001dad559252b4
After the build completes successfully, push the container image to the image registry to prepare it for deployment.
❯ podman push quay.io/rh_rh/wko-aux:latest

Getting image source signatures
Copying blob sha256:2b9eb807182112dd80cafdb24eea19f8631f883d6b45fda27fe8841afc631f3c
.....

Copying config sha256:9b198828543328eaeba1d791ed5aa25719f2e0e2b5133c8a5d001dad559252b4
Writing manifest to image destination
Model YAML
A Model YAML file is a declarative configuration file used by Model in Image together with the WebLogic Deploy Tooling (WDT) to define the structure and configuration of a WebLogic domain.
Instead of manually configuring WebLogic through the Admin Console or WLST scripts, you describe the domain configuration in YAML format. At runtime, WDT reads this file and applies the configuration automatically when the pod starts.
A typical Model YAML can define:
- Domain name and domain-level settings
- Admin Server configuration
- Managed Servers and clusters
- Data sources (JDBC)
- JMS resources
- Security configurations
- Application deployments
- Environment-specific variables
It represents the desired configuration state of the WebLogic domain.
model.properties
# Admin server
AdminServer.name=admin-server
AdminServer.listenPort=7001
AdminServer.SSL.listenPort=7002

# Server template, used by Managed Server
ServerTemplate.server-template-1.listenPort=8001
ServerTemplate.server-template-1.SSL.listenPort=8100

# Managed server
ManagedServer.serverNamePrefix=managed-server
ManagedServer.serverTemplateName=server-template-1
ManagedServer.maxDynamicServerCount=3
model.yaml
domainInfo:
  AdminUserName: "@@SECRET:__weblogic-credentials__:username@@"
  AdminPassword: "@@SECRET:__weblogic-credentials__:password@@"
topology:
  Name: "@@ENV:DOMAIN_UID@@"
  AdminServerName: "@@PROP:AdminServer.name@@"
  DomainVersion: 12.2.1.4.0
  Cluster:
    "app1-cluster":
      DynamicServers:
        ServerNamePrefix: "@@PROP:ManagedServer.serverNamePrefix@@"
        CalculatedListenPorts: false
        MaximumDynamicServerCount: "@@PROP:ManagedServer.maxDynamicServerCount@@"
        ServerTemplate: "@@PROP:ManagedServer.serverTemplateName@@"
        DynamicClusterSize: "@@PROP:ManagedServer.maxDynamicServerCount@@"
  Server:
    "@@PROP:AdminServer.name@@":
      ListenPort: "@@PROP:AdminServer.listenPort@@"
      SSL:
        ListenPort: "@@PROP:AdminServer.SSL.listenPort@@"
  ServerTemplate:
    "@@PROP:ManagedServer.serverTemplateName@@":
      ListenPort: "@@PROP:ServerTemplate.server-template-1.listenPort@@"
      Cluster: "app1-cluster"
      JTAMigratableTarget:
        Cluster: "app1-cluster"
      SSL:
        ListenPort: "@@PROP:ServerTemplate.server-template-1.SSL.listenPort@@"
appDeployments:
  Application:
    quickstart:
      SourcePath: wlsdeploy/applications/quickstart
      ModuleType: war
Target: "app1-cluster"I’m a cloud-native software architect passionate about building resilient, scalable systems. My work focuses on Java and modern frameworks like Quarkus, Spring, microservices architecture, Kubernetes, Service Mesh, and DevSecOps automation. I’m currently working as Consulting Architect in Red Hat Asia Pacific.